Pages

Tuesday, 28 May 2013

Living the Sample Life: Should I be more picky?

This is really a post about 2 issues, they sort of link, well they do in my mind!


I've received a couple more samples since my last post, consisting of packets of E45 lotion and Boss Nuit perfume. My favourite so far arrived today and is a sample of Chanel's Voluminising  Mascara, all wrapped up in a really posh box.

Since applying for samples, I've been thinking if I should be more selective. It's so easy to get carried away, especially when it's free.

A couple of days ago I decided to do some research on ethical/unethical companies. It's been on my heart for a while and was brought forward to my mind after the story of the collapsed building in Bangladesh, highlighting the conditions some people work in just so we can get cheap clothes.

I stumbled across an article about Nestle, a company I have always been a bit dubious about, but after reading that the CEO said that water should be paid for and is not a human right, got me so angry, that I decided once and for all never to buy any Nestle products again.

Now is this going to be hard at first as I really like Rolos, and After Eight mints, and it cuts out a lot of cereal. I was so surprised to find out Nestle also own parts of L'Oreal, Garnier and Maybelline and also Body Shop!

Body Shop is one of my favourite shops and it really upset me that if I am to stick to my promise to never buy Nestle products, that would mean Body Shop has to go too.

This has therefore made me more selective about which samples I go for. Like today, Maybelline are giving away thousands of make up samples, but because Nestle owns part of the company, I won't apply for it. It may be a free sample and it won't cost me anything, but it promotes the company that costs the lives of so many other people.

When I go shopping, I now check the back of bottles to make sure who the product the is made by, the ingredients (I'm now trying to buy products without parabens in them) and where it was produced, (ideally in the UK). 

What are the reasons for me doing this?

I'm not doing this to make myself look good, I have decided to do this as it has been on my heart to do something to make a difference, even if it a small one. You can get an idea what a person is like by their shopping and what they choose to buy and for me I want to try to buy products that show I think carefully about where it has come from and the company that produced it.

I might not have explained it properly (sometimes I can't find the right words to get across what I mean) but hopefully you get it.

Saturday, 18 May 2013

Living the Sample Life #1

Just like everyone else, I'm feeling the pinch. Unfortunately I really like shopping , and as I am currently still looking for work, a stroll round the shops helps to break the monotony of another day being unemployed.

I heard a while back about websites that offer samples of leading products. I did sign up for one, but got a load of spam emails instead, so decided to leave it.

About 3 weeks ago I thought I give it another go, this time a little bit wiser to check the small print. I found a site called Magic Freebies that have been given good reviews and had a look at it. 

Every day it offers a least 8 new freebies to give away and does competitions and vouchers as well. 

It's easy to get carried away and it helps to be more selective about what you sign up for, I mean do you really want a tote bag from Quick Quid?

I only request samples that don't ask for my mobile number and always make sure all the little boxes at the bottom are ticked or unticked so I don't receive any unwanted emails.

Already I have received a sample of Flora Garden by Gucci and 3 samples of Ganier face creams. It's quite exciting to come home and found the postman has been and posted some new samples through the door (unless it's just me!)

Will keep updating with any more samples I get.


Tuesday, 5 March 2013

Massive Cookie!

Saturday just gone, a friend of ours had a 18th birthday party. Not knowing what to get him, I decided to make a huge cookie as I've recently been practising making cookies again.


Recipe

you will need....

125g unsalted butter, softened
125g dark muscovado sugar
1 egg
190g self raising flour
2 tbsp cocoa powder
half tsp almond extract
120g of milk and white chocolate roughly chopped

* Preheat the oven to 190 C or Gas 5. 

*Put the butter and sugar into a large bowl and cream until fluffy. Gradually beat in the egg and add the almond extract.

*Sift the flour and cocoa powder into the bowl and gently fold it into the egg mixture. Stir in the chopped chocolate pieces.

* Spoon the mixture into a round silicon cake tin. Make sure it is spread evenly, but don't worry if it doesn't go right to the edge. As the butter melts the mixture will spread to edge. Place the silicon tin on a baking tray before you put it in the oven so it's easier to put it in and take it out again.

* bake for 15-20 minutes. The cookie should feel slightly hard to the touch.

* Remove from the oven and place the silicon tin on a cooling rack and allow to cool down. The cookie will still be soft, so when it ha cooled and slightly hardened, carefully turn it out onto a plate/board.

I melted white chocolate and piped it on with a makeshift piping bag make out of a plastic sandwich bag!

Monday, 4 February 2013

What to do with old cards...

Now, some of you who know me, know that I am quite a sentimental person and keep hold of useless items that hold special memories, like cinema tickets, train tickets etc and I often keep all my birthday and Christmas cards. 

Now this habit has started to a little bit annoy my husband, as I am a bit of a clutter maker, so to keep him happy and the house tidy, I've decided to use my cards creatively.

Idea #1 - Gift tags
Last Christmas especially was quite tight money-wise for us, so instead of buying gift tags that will end up in the bin anyway, I decided to turn some of my old Christmas cards into tags, using a hole puncher to make a hole in the corner, some fancy pinking scissors to cut a funky edge around the tag, and those little ribbon tags you find in clothes that either itch you or end up sticking out from under your armpits.

Idea #2 - Cheap way to decorate
Sometimes it's expensive to buy pictures to decorate your room with. I have a lot of birthday cards that are just pictures on the front and since they were pretty enough to hang up on the wall that is exactly what I did.
I asked around for old photo or picture frames people didn't want anymore (you can also check out charity shops and just get rid of the naff picture but keep the frame) and put my cards inside the frames.


This one was a birthday card from 2 years from a friend who appreciate pretty pictures like me :) This is now hung up in the bathroom opposite the toilet, so when you're doing your business, you can look onto a lovely beach  scene :D


This is another birthday card from 2 years ago. I've hung this one up in the kitchen. I have loads of cards that have cupcakes on them, so I'm hoping to find more frames and have a cluster of them on the wall.
I love to bake so these definitely need to be in the kitchen!


This one is a Christmas card my husband and I got from a friend last year. She illustrated it herself and I found it too pretty to throw away, so it's now in a frame standing pride of place on the mantel piece in the front room.

Monday, 14 January 2013

Operation Front Room! Upholstering chairs

Recently we have had the front room repainted after we had insulation put in, and today I've hung up the curtains again and started to re-upholster the chairs.

The chairs came with the house and were probably as horrible to look at brand new as they do now that they're old!

I used material I was given for free by a lady I know from Church after I got locked out of my house one time (sometimes there are advantages to locking yourself out!)

I bought some upholstery nails from Wilko's for 99p a packet, with approx 25 in each, so with free chairs and material, it has cost me under £2.00 to make the chair look better.

 So here is a comparison between the two chairs. The yucky brown chair on the right is how they originally looked like and on the left is my effort to make them look better.

I used trial and error to attach the cloth onto the chair, it's really messy underneath, but who's going to look under there?!

Thursday, 10 January 2013

Operation Front Room!

I've been living in a rented house for over a year now, and I haven't really done a lot to it to make it feel more homely as I wasn't sure how long I was going to stay here.

Recently we have had insulation work done. Because we don't have cavity walls, they had to attached 90mm foam boards to the inside of the house at the front, and onto the outside of the house at the back. This means the walls of the front room and front bedroom are now an extra 9 cm thick and are now a different colour to the rest of the house.

Our landlady has organised a decorator to come in and repaint the walls, and this has spurred me on to actually make the house more like a home.

The front room currently is the spare bedroom for guests and is used as my husband's computer room, so I've decided to claim the front room as my own, to store all my sewing and craft things that are currently taking over the living room.

 At the moment, the front room is being used as a storage space. It's a very small room dominated by a massive fire place and a huge cupboard/shelving unit, and it can get very cold, so hopefully the insulation will make a difference.

One of the other reasons I want to start using the front room, apart from storing my craft and knitting things, is to use it as my office. I have always wanted to write a novel, and I have had an idea for a story for the past 4 years but unfortunately I think finding things to distract myself. The living room is too comfortable with a sofa and tv, so I thought if I had a space dedicated to just writing and being creative, it might help me to be more disciplined.


I have made a small start on the room by changing the curtains. The previous curtains were thin and a beige colour, so not very inspiring , so I change them for cream ones with blue/green poppies on them. They were £9.99 from Home Bargains and they match the carpet really well.


I have also started re-upholstering some of the chairs that came with the house, as we can't afford new chairs. I had some material left over from a door curtain I made and cut out a square to re-cover the chair.

To attach the material, I must admit, was a bit of a botch job, using things I could find around the house. So I used a mixture of drawing pins and small nails, but it works so I'm not complaining :)


So this is now my project to keep me occupied while looking for a job at the same time. I will try to update this more regularly than I have done before and hopefully there are ideas here that you can use too!


Wednesday, 12 December 2012

Memory Blanket

At the moment I have the builders round to put in some insulation, which means I have to be in the house to let them in. Yesterday they switched off the gas for a while, which I annoyed me a bit as I wanted to make some mince pies, so I had to find something else to occupy myself.

I've had an idea for a couple of weeks to make a blanket, but each square would represent each year Spence and I have been married. This has now evolved into a Memory Blanket,as I would get too impatient waiting for our next anniversary to knit a square. I managed to create my own pattern and knit the square in one day and I was really pleased with the result.

I do hope that this blanket will grow and be filled with happy memories and that it will be used and cherished by future generations. It will be a picture story telling the life of our little family.

I will update the blog with new squares when I make them, and you can watch the blanket grow :) and hopefully it will encourage you to create your own, whether knitted like mine or maybe even a scrapbook.


The red square is the day Spence and I got married and the Snowflake square represents our first Christmas together as Mr and Mrs.

Wednesday, 31 October 2012

My New Shop

I'm aware I haven't written on my blog for such a long time, that is because I have been a very busy bee :)

I have started a little business called J'adorele back in September and that has had most of my attention. I make knitted items such as hats, scarves, and blankets and hand sewn items like my t-shirt cushion covers and Christmas Stockings.

At the moment I do have a sale on. 10% off all items listed on my etsy shop and 30% off all custom orders and free delivery. I also have a facebook page and a twitter account so please check them out!


Monday, 3 September 2012

My New Draft Excluder


Because of subsidence of the ground (I don't know when it happened, it was before I moved in) there is a massive gap between the kitchen floor and the bottom of the door and on really cold nights, you can feel the cold air coming through. So I decided to make a draft excluder to try keep the cold out.

If you want to make your own this is how I made mine.


  • 4mm knitting needles (size 8)
  • odd balls of wool in the colours of your choice - I used cream, white brown and red as those are the colours in the room
  • stuffing - I used rags left over from tshirts I made into cushion covers. You could use old clothing and cut into pieces for stuffing.
  • Wool sewing needle - if you don't have one, use a large strong sewing needle.

Measure the bottom edge of your door and make the length of your draft excluder a inch or two longer than the door measurement. My excluder is 33 inches.

Cast on 50 stitches and knit in stripes. I alternated between garter stitch and stocking stitch on each stripe, so a cream stripe is all garter stitch then the red stripe is stocking stitch and so on.

When your draft excluder is the length you want, cast off and join the edges using blanket stitch using the wool needle and fill it with the choice of your filling as you go along.

this link shows you how to do a blanket stitch http://www.cherrymenlove.com/crafts-how-tos/2009/11/how-to-sew-blanket-stitch.html

thanks for reading!

Thursday, 12 July 2012

T-shirt Cushion

I have loads of old clothes that I find hard to throw away as they have sentimental value or are just too pretty to get rid of. So I decided to make some into cushion covers.

The instructions will fit a cushion pad size 18 x 18 inches.

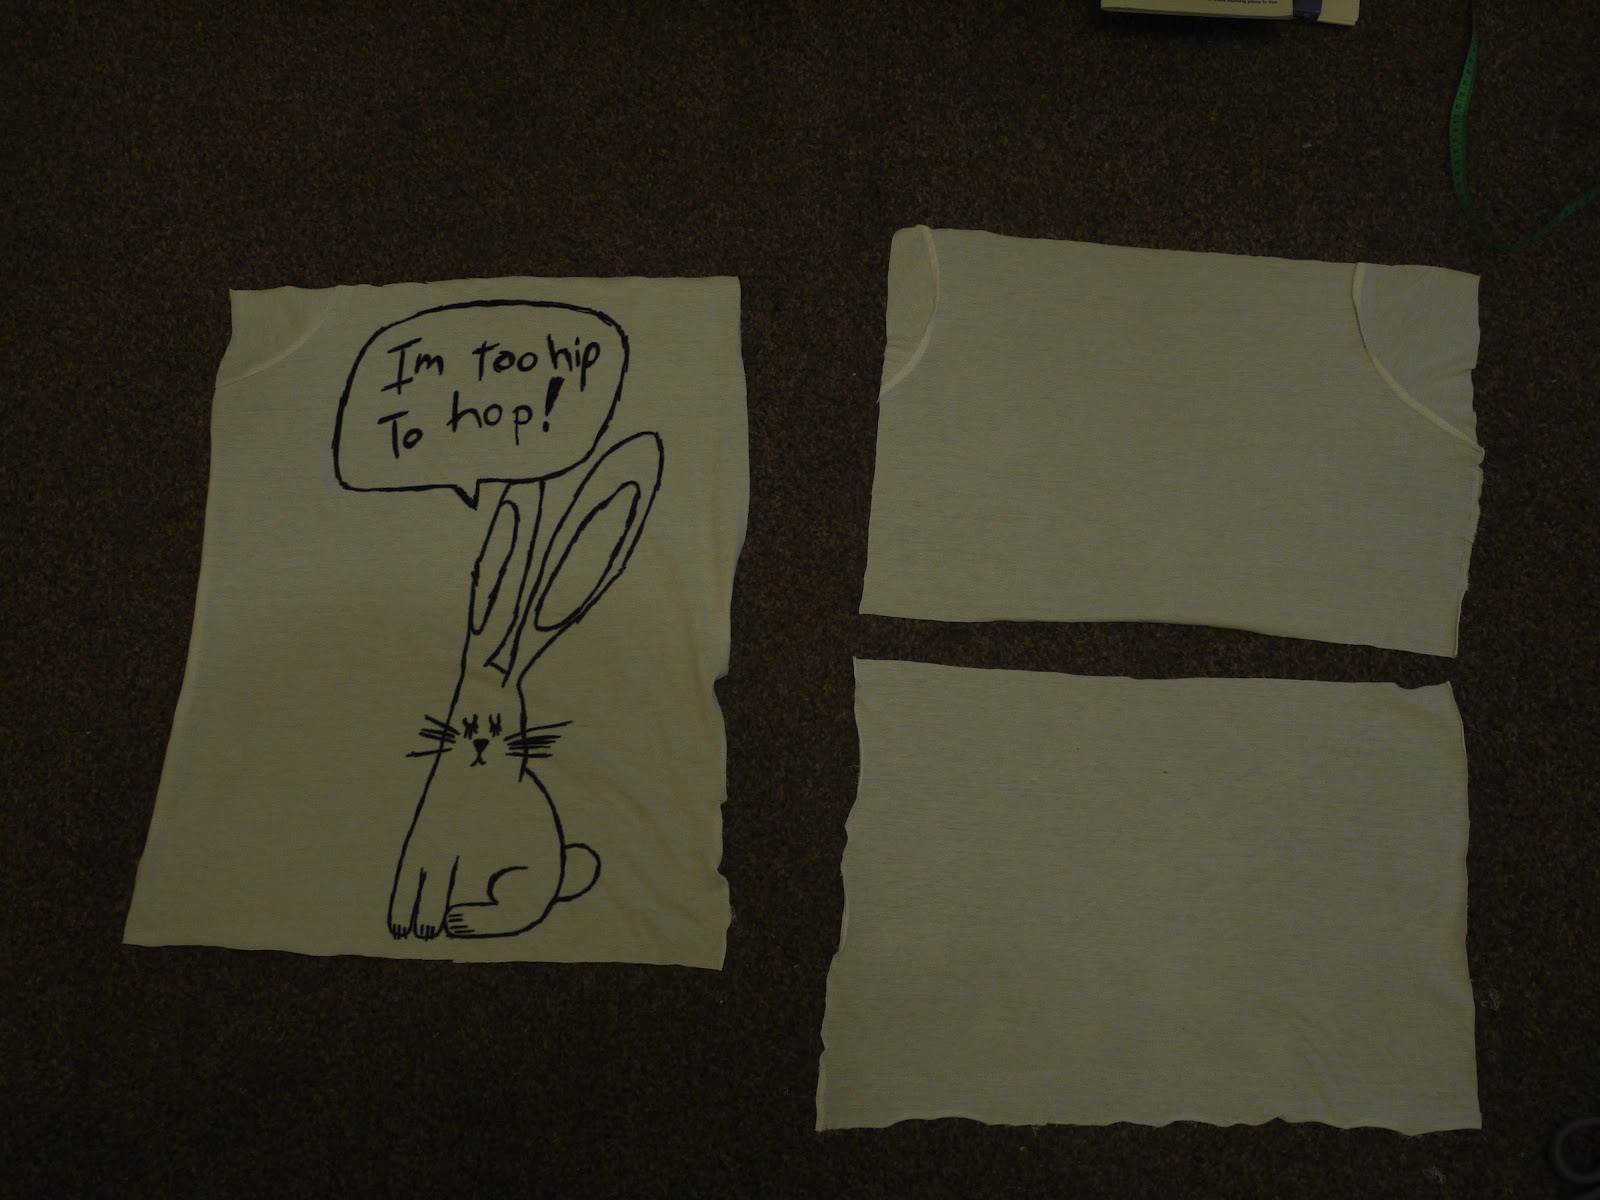
1) First select your tshirt/item of clothing.


2) unpick or cut along the hem and side seams so it looks like an apron.


3) Cut out a 20 x 20 inch piece of the front piece and two 20 x 12 inch pieces for the back of the cushion. (However mine in the photo turned out rectangular by accident!)


4) with the two back pieces, hem one end of each.


5) when you have finished hemming the back pieces, place the t shirt front on the floor with the right (front) side facing you. Then place the back pieces on top with the wrong side facing you (you're making the cushion cover inside out). The back pieces should overlap.
 Pin together and sew either by hand or with a sewing machine. When finished, remove pins, turn it the right way out and you have a cushion!

you can do this pattern with other clothes than just t-shirts. For ideas add buttons, ribbons and patches to make your cushion unique.

Friday, 29 June 2012

Cute bear hat

At the moment I'm doing a lot of knitting as I have some friends expecting a baby soon, so I've been knitting some little hats and currently progressing through a baby blanket.

At church on Sunday night, they were showing the England v France football match, (which didn't end well for us) and for those who didn't want to watch the match, the Muppets film was being shown in another room.

As I was trying to knit in the dark with Kermit and Miss Piggy on screen, my friend Beth saw the little hat with bear ears on it and asked me if I could knit one for her and that she would pay me for it. Well I wasn't going to turn that down, and I wanted to knit an adult size bear hat for ages but never got round to it.

I didn't use a pattern off the web, instead I just adapted a pattern that I already had and attached ears to it :)

I used 5mm and 6mm straight needles.

Cast 108 sts using 5mm needles.
Do a K2, P2 rib for 6 rows.
On the 7th row P2, P2tog (P4, P2 tog)

Change to 6mm needles

Beginning with a Knit row, continue in stocking stitch until the hat measures about 23cm from beginning, ending on a Purl row.

Shape Crown
1 - K1 (K2tog, K3) k2tog, k2
2 - Purl
3- k1 (k2tog, k3)
4 - Purl
5 - k1 (k2tog, k2)
6 - purl
7 - k1, (k2tog, k1)
8 - purl
9 - k1, k2tog

thread yarn through remaining stitches and pull tightly. Sew up the hat and weave in the ends.

Ears x 2

Using 6mm needles cast on 12 sts
Work in garter st for 8 rows
9 - K2tog, k to last 2, k2tog (10 sts)
10 - k2tog, knit to last 2, k2tog (8 sts)
11 - k2tog, knit to last 2, k2tog (6 sts)
12 - k2tog, knit to last 2, k2tog (4 sts)

Rows 13 - 16 increase 1 st at the beginning and end of each row until you have 12 sts again, Work in garter st for 8 rows and cast off.

Sew up the ears and attach to hat.


Monday, 25 June 2012

Back again with bridesmaids' bouquets

Hello, it's been a while since my last post, mostly due to the fact I was busy with wedding prep and I got married! 

The days leading up to the wedding were so stressful as I still had 1 bridesmaids bouquet to finish and I was panicking that it wasn't going to get finished. Luckily though it all came together and it looked fantastic on the day :)

I used the same technique as my bouquet, a polystyrene ball with knitted roses attached to it with diamante corsage pins. I also used 2 corsages I bought from a haberdashery in the sale for 98p each, as it went with the colours and also took up some space so I didn't need to knit more roses!

The pattern was a lot simpler and bigger than the one used for my bouquet and I got it off the knittingpatterncentral.com website, which is like a database of free knitting patterns for personal use.

The pattern is this:

Row1 : k60
Row2 : k2, [yo, k2tog, k4] 9 times, yo, k2tog, k2
Row3: k60
Row4: k60
Row5: k60
Row6: k60
Row7: k60
Row8: k5, [yo, k2tog, k4] 8 times, yo, k2tog, k5
Row9: k60
Row10: k2tog 30 times
Row11: k30
Row12: k2tog 15 times
Row13: k15
Row14: k2tog 7 times, k1
Row15: k8
Row16: k2tog 4 times
Row17: k4
Cast off leaving a long length to use use for sewing
Twist into a rose shape and sew to secure..

This pattern was also used for the buttonholes and for the table place settings for each guest, with their name written on a paper leaf attached to it.


Friday, 23 March 2012

Favourite Recipes #2 Apple and Blackberry Tray Bake

This is a recipe I have wanted to try for a while and the opportunity came when our latest Asda food delivery substituted some fruit we ordered for blackberries.

So this is the recipe I used to make them, and they taste really good, perfect for packed lunches and last for about 3 days, if you don't eat them all first!


Apple and Blackberry Tray Bake

100g softened butter
175g self raising flour
1tsp baking powder
175g golden caster sugar
2 eggs
1 lemon rind
1 Cox's apple, diced
150g blackberries

1) Preheat the oven to Gas 5, 190 c, fan 170 c. Line a shallow 20cm (8in) square cake tin with baking parchment.

2) Place all the ingredients, except the apple and blackberries, into a large mixing bowl and beat with a wooden spoon until smooth.

3) Stir in the apple and blackberries and spread into the tin. Bake for 30-35 minutes until golden and the centre is firm to touch.

4) leave in tin for 10 minutes before turning out and allowed to cool completely. Cut into squares. Keeps for 3 days.

Monday, 19 March 2012

Wedding Idea: Bunting

I currently have a massive bag of flowery bedding you're likely to see in your Grandma's bedroom sitting in the living room. I asked family for fabric with pink/cream/burgundy flowers and patterns and have been inundated with donations!

The reason for this is, instead of having fresh flowers decorating the church, we're going for bunting. I didn't have it in mind straight away, it just came to me as I thought about how to decorate the church and the idea of having lengths of brightly coloured bunting hanging in the church really appealed to me. It's also good for a wedding on a budget and recycling materials.
We're also using bunting in the church hall and at the evening reception venue.

I got the pattern from this website: http://rosalindgracedesigns.blogspot.co.uk/2009/04/free-bunting-template-and-tutorial.html

All you need is old cotton bedsheets/shirts, bias binding, pins, thread, sewing machine, cardboard template of the size of bunting you want and a good pair of dress making scissors.

Bias binding is the long strip of fabric holding it all together. I got a 50 metre roll for about £7 from Amazon. I've been making bunting 5 metres in length.

Bunting is a quick and cheap way to decorate any venue for any occasion. I think it's perfect for a summer party and gives a vintage nostalgic feel.


Tuesday, 6 March 2012

Gift Idea #1 Mini Canvas

Friends' birthdays often have the habit of sneaking up on you and when you finally realise, you either have no time or money to get them a present. At the moment, money is often tight for me, so I came up with an idea to make a unique present that my friends' would love that was quick to make and affordable.


I have a box at home full of little bits and bobs I've found lying around, including broken brooches, bows and ribbons off packaging and chocolate boxes, buttons, little bells off the Lindt Chocolate Bunnies :) and lots of other things.
I was given a sparkly butterfly by a friend, which use to be on a ring but fell off and had another butterfly that use to be a brooch. I really wanted to use these in a project and one day I was in The Works bookshop and they sell mini canvases on easels for 99p each. I bought two and knew that I wanted to combine the two things in some way.
At home I used acrylic paints and painted the two canvases (which was quick as they are so small!) and when the paint was dried wrote the names of the friends on them with gold or silver pens and superglued the butterflies onto them.

The great thing about this idea is you can use anything instead of butterflies, maybe something that reflects your friend or something they like, as long as it's small and not too heavy. You could use any colour paint and because it's small, it could put it anywhere on a shelf, table or desk and just sit there looking all decorative and pretty :)


Monday, 5 March 2012

How to make a skirt out of a pair of jeans


We've all been there. You put on your most favourite, comfortable jeans that you have had for ages and then discover a massive hole or rip in an unfortunate place. What do you do? Well if you can't bear to throw them away, why not turn them into a skirt?
This is what I'd done with my jeans that have had holes worn into them. (The picture above is the 1st ever skirt I made and used it as a distraction from packing!)

1) cut off the legs a couple of centimetres down from the rip or hole (so it looks like really short shorts)

2) Using an thread unpicker (you can get them from haberdashery shops and online) unpick the seams up the inside legs to the crotch so it looks like an untidy skirt.

3) on the front and the back of the skirt, lie the seams that would have formed the seat of the jeans to the side and pin down.  Cut off any material that hangs down to create a straight hem.

4) Using thread that is a similar colour to the originial thread, use back stitch to stitch the seams down. Do this on the front and back of the skirt.

 5) I tried to do a similar style seam to the original one so it blended in better, however you can do whatever you like to your own skirt.

6) And after that you have your finished skirt! If you want to, you could do a hem around the bottom of the skirt if you don't like the deconstructed look that much. Also you could embellish it with sequins, ribbons, buttons etc or even sew some fabric around the bottom of the skirt to give it a really cute country look.

Hope this inspires to recycle your jeans and that you give it a go :)

Don't know what to do with the left over legs? I have an idea for a rug but that will be another post ;P

Saturday, 3 March 2012

My Favourite Recipes #1 Honey and Soy Glazed Chicken

At home I have a massive folder full of recipes I've ripped out of magazines, mostly the ones you pick up for free at supermarkets.
This recipe was actually from an advert for Amoy Dark Soy Sauce and it was one of my favourite recipes as a student (and still is) mostly because it is so tasty and you only need 4 ingredients for the marinade, so it's so quick and easy to make.

Honey and Soy Glazed Chicken

1) Mix 3 tbsp Dark soy sauce + 3 tsp honey + 1tsp lemon juice + pinch of black pepper.
2) Pour half of the marinade over 2 chicken breasts and leave for 5 mins.
3) In a shallow tray, grill chicken on a medium heat for 15 minutes. While grilling continue to pour the remaining marinade over the chicken.
4) Serve immediately.

This really tasty with noodles or rice and in a stir fry. Hope you like it!

Wednesday, 29 February 2012

My Handmade Wedding Bouquet

I'm getting married in about 3 months time and I'm making my own bouquet as fresh flowers can be so expensive and I wanted something totally unique and different. I had the idea to make knitted flowers for my bouquet and found a rose pattern online. It consists of five individual petals that you wrap around and sew together. I've made nearly a 100 already and now know the pattern by heart, (and already getting sick of it!).

The colours are cream and burgundy/deep red and most of the yarn was donated by family and friends. I bought a piece of ribbon for 15p and a polystyrene ball for £2.50 off Amazon. I did buy one previous but accidentally melted it with super glue :s so had to buy another one and stuck the two halves together with PVA glue and lots of pins.

To secure the roses to the ball, I bought 100 diamante corsage pins off Amazon (love Amazon) for £3.25. They're 1.5 inches long and the 'diamantes' are actually made out of plastic and on their own they don't look like anything special but in the rose they take on a different life and look so pretty. I have recently ordered another 3 boxes as I've got a quarter left of the ball to cover and also need to do the bridesmaids' bouquets too (there will be probably another post about them later).

So I estimate that my bouquet alone has cost me under £15 for materials, though has cost a lot of time for labour, but since I'm unemployed I have the luxury of time!

So far I'm really pleased with the result and can't wait for it to be finished. I hope you like it too :)


if you're interested in the knitting pattern here it is :)

Rose Corsage (Copyright Alison Hogg 2009) for personal use only

Materials
3.00mm needles
scraps of double knitting yarn
brooch back

Abbreviations
k = knit
p = purl
sl = slip
st(s) = stitch(es)
psso = pass slip st over
inc = increase (k into front and back of st)

Inner Petal
Cast on 7 sts, leaving a long yarn tail for sewing up.
ROW 1 : k.
ROW 2 : p (right side).
ROW 3 : sl1 k’wise, k to end of row.
ROW 4 : p.
ROW 5 : sl1 k’wise, k to end of row.
ROW 6 : p.
ROW 7 : sl1 k’wise, k1, psso, k to end of row (6 sts).
ROW 8 : p.
ROW 9 : sl1 k’wise, k to end of row.
ROW 10 : p.
ROW 11 : sl1 k’wise, k1, psso, k to end of row (5 sts).
ROW 12 : p.
ROW 13 : sl1 k’wise, k to end of row.
ROW 14 : p.
Cast off k’wise.

Middle Petals (make 2)
Cast on 4 sts.
ROW 1 : k.
ROW 2 : p.
ROW 3 : inc every st (8 sts). (recommended inc - kfb)
ROW 4 : p.
ROW 5 : inc every st (16 sts).
ROW 6 : sl1 p’wise, p to end of row.
ROW 7 : sl1 k’wise, k to end of row.
ROW 8 : sl1 p’wise, p to end of row.
ROW 9 : sl1 k’wise, k1, psso, k to last 2 sts, (k2tog) (14 sts).
ROW 10 : sl1 p’wise, p to end of row.
ROW 11 : sl1 k’wise, k1, psso, k to last 2 sts, (k2tog) (12 sts).
ROW 12 : sl1 p’wise, p to end of row.
ROW 13 : sl1 k’wise, k1, psso, k to last 2 sts (k2tog) (10 sts).
ROW 14 : sl1 p’wise, p to end of row.
Cast off k’wise.

Large Outer petal (make 2)
Cast on 5 sts.
ROW 1 : k.
ROW 2 : p.
ROW 3 : inc every st (10 sts).
ROW 4 : p.
ROW 5 : inc every st (20 sts).
ROW 6 : sl1 p’wise, p to end of row.
ROW 7 : sl1 k’wise, k to end of row.
ROW 8 : sl1 p’wise, p to end of row.
ROW 9 : sl1 k’wise, k1, psso, k to last 2 sts, (k2tog) (18 sts).
ROW 10 : sl1 p’wise, p to end of row.
ROW 11 : sl1 k’wise, k1, psso, k to last 2 sts, (k2tog) (16 sts).
ROW 12 : sl1 p’wise, p to end of row.
ROW 13 : sl1 k’wise, k1, psso, k to last 2 sts, (k2tog) (14 sts).
ROW 14 : sl1 p’wise, p to end of row.
ROW 15 : sl1 k’wise, k1, psso, k to last 2 sts, (k2tog) (12 sts).
ROW 16 : sl1 p’wise, p to end of row.
Cast off k’wise.

Leaf
Cast on 3 sts with green yarn.
ROW 1 : k.
ROW 2 : p.
ROW 3 : inc1, inc1, k (5 sts). (recommended inc - kfb)
ROW 4 : sl1 p’wise, p to end of row.
ROW 5 : sl1 k’wise, inc1, inc1, k2 (7 sts).
ROW 6 : sl1 p’wise, p to end of row.
ROW 7 : sl1 k’wise, k1, inc1, inc1, k3 (9 sts).
ROW 8 : sl1 p’wise, p to end of row.
ROW 9 : sl1 k’wise, k2, inc1, inc1, k4 (11 sts).
ROW 10 : sl1 p’wise, p to end of row.
ROW 11 : Cast off 1 k’wise, k to end of row (10 sts).
ROW 12 : Cast off 1 p’wise, p to end of row (9 sts).
Rpt ROWS 11 – 12 until 1st remains (purl row).
Fasten off.

To Assemble Rose
1. Weave all loose yarns away - down the edge of the petals, except for the tail at the cast on edge of the Inner Petal.
2. Place the Inner Petal piece flat, purl side down. Cast on edge is at the side and the decreasing edge is at the top. Starting at the cast on edge roll the petal tightly, so that purl side is turned to face outwards. 
3. Sew the base firmly together with the yarn tail.
4. Wrap the four petals around the inner petal, with the purl side facing towards the inner petal and the cast on end at the base. Stagger the two middle petals and then the two large ones . Sew each petal firmly to the base and bottom edge of petals as you go. Keep the petals tight.
5. Attach the leaf (knit side facing outwards) to the back of rose