Pages

Thursday, 12 July 2012

T-shirt Cushion

I have loads of old clothes that I find hard to throw away as they have sentimental value or are just too pretty to get rid of. So I decided to make some into cushion covers.

The instructions will fit a cushion pad size 18 x 18 inches.

1) First select your tshirt/item of clothing.


2) unpick or cut along the hem and side seams so it looks like an apron.


3) Cut out a 20 x 20 inch piece of the front piece and two 20 x 12 inch pieces for the back of the cushion. (However mine in the photo turned out rectangular by accident!)
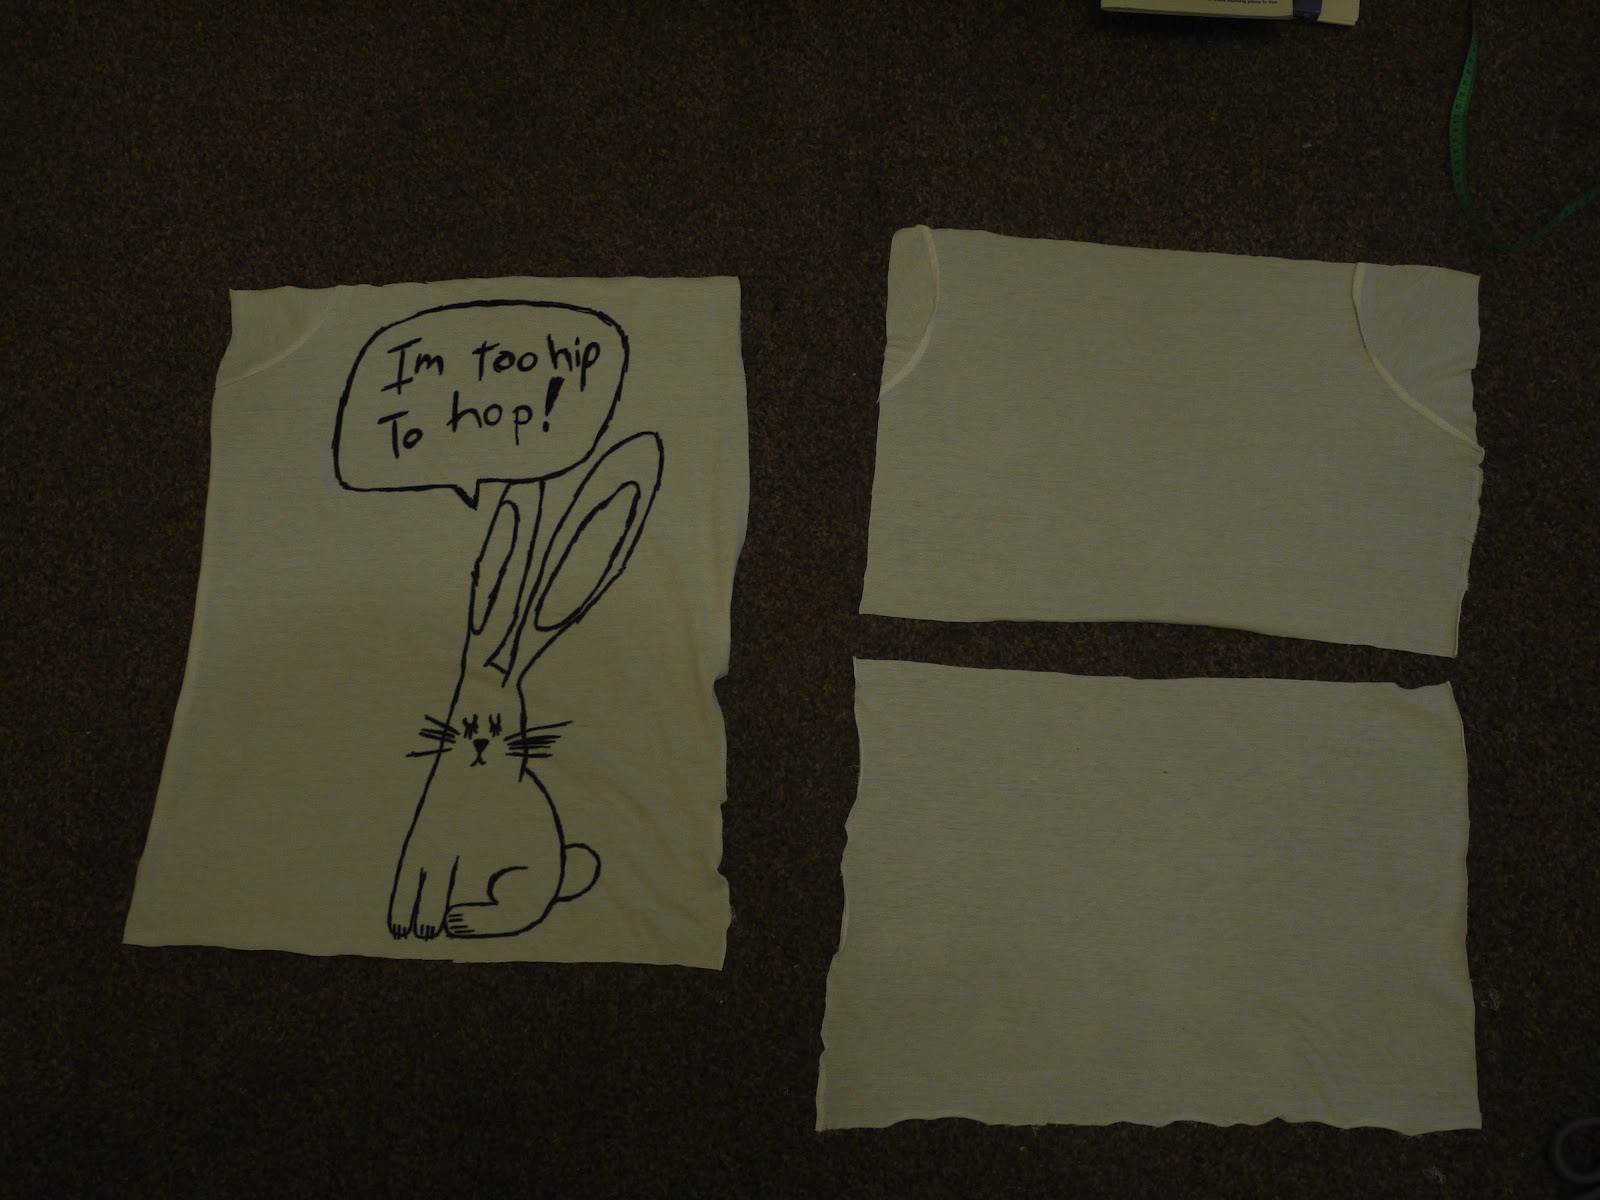

4) with the two back pieces, hem one end of each.


5) when you have finished hemming the back pieces, place the t shirt front on the floor with the right (front) side facing you. Then place the back pieces on top with the wrong side facing you (you're making the cushion cover inside out). The back pieces should overlap.
 Pin together and sew either by hand or with a sewing machine. When finished, remove pins, turn it the right way out and you have a cushion!

you can do this pattern with other clothes than just t-shirts. For ideas add buttons, ribbons and patches to make your cushion unique.

Friday, 29 June 2012

Cute bear hat

At the moment I'm doing a lot of knitting as I have some friends expecting a baby soon, so I've been knitting some little hats and currently progressing through a baby blanket.

At church on Sunday night, they were showing the England v France football match, (which didn't end well for us) and for those who didn't want to watch the match, the Muppets film was being shown in another room.

As I was trying to knit in the dark with Kermit and Miss Piggy on screen, my friend Beth saw the little hat with bear ears on it and asked me if I could knit one for her and that she would pay me for it. Well I wasn't going to turn that down, and I wanted to knit an adult size bear hat for ages but never got round to it.

I didn't use a pattern off the web, instead I just adapted a pattern that I already had and attached ears to it :)

I used 5mm and 6mm straight needles.

Cast 108 sts using 5mm needles.
Do a K2, P2 rib for 6 rows.
On the 7th row P2, P2tog (P4, P2 tog)

Change to 6mm needles

Beginning with a Knit row, continue in stocking stitch until the hat measures about 23cm from beginning, ending on a Purl row.

Shape Crown
1 - K1 (K2tog, K3) k2tog, k2
2 - Purl
3- k1 (k2tog, k3)
4 - Purl
5 - k1 (k2tog, k2)
6 - purl
7 - k1, (k2tog, k1)
8 - purl
9 - k1, k2tog

thread yarn through remaining stitches and pull tightly. Sew up the hat and weave in the ends.

Ears x 2

Using 6mm needles cast on 12 sts
Work in garter st for 8 rows
9 - K2tog, k to last 2, k2tog (10 sts)
10 - k2tog, knit to last 2, k2tog (8 sts)
11 - k2tog, knit to last 2, k2tog (6 sts)
12 - k2tog, knit to last 2, k2tog (4 sts)

Rows 13 - 16 increase 1 st at the beginning and end of each row until you have 12 sts again, Work in garter st for 8 rows and cast off.

Sew up the ears and attach to hat.


Monday, 25 June 2012

Back again with bridesmaids' bouquets

Hello, it's been a while since my last post, mostly due to the fact I was busy with wedding prep and I got married! 

The days leading up to the wedding were so stressful as I still had 1 bridesmaids bouquet to finish and I was panicking that it wasn't going to get finished. Luckily though it all came together and it looked fantastic on the day :)

I used the same technique as my bouquet, a polystyrene ball with knitted roses attached to it with diamante corsage pins. I also used 2 corsages I bought from a haberdashery in the sale for 98p each, as it went with the colours and also took up some space so I didn't need to knit more roses!

The pattern was a lot simpler and bigger than the one used for my bouquet and I got it off the knittingpatterncentral.com website, which is like a database of free knitting patterns for personal use.

The pattern is this:

Row1 : k60
Row2 : k2, [yo, k2tog, k4] 9 times, yo, k2tog, k2
Row3: k60
Row4: k60
Row5: k60
Row6: k60
Row7: k60
Row8: k5, [yo, k2tog, k4] 8 times, yo, k2tog, k5
Row9: k60
Row10: k2tog 30 times
Row11: k30
Row12: k2tog 15 times
Row13: k15
Row14: k2tog 7 times, k1
Row15: k8
Row16: k2tog 4 times
Row17: k4
Cast off leaving a long length to use use for sewing
Twist into a rose shape and sew to secure..

This pattern was also used for the buttonholes and for the table place settings for each guest, with their name written on a paper leaf attached to it.


Friday, 23 March 2012

Favourite Recipes #2 Apple and Blackberry Tray Bake

This is a recipe I have wanted to try for a while and the opportunity came when our latest Asda food delivery substituted some fruit we ordered for blackberries.

So this is the recipe I used to make them, and they taste really good, perfect for packed lunches and last for about 3 days, if you don't eat them all first!


Apple and Blackberry Tray Bake

100g softened butter
175g self raising flour
1tsp baking powder
175g golden caster sugar
2 eggs
1 lemon rind
1 Cox's apple, diced
150g blackberries

1) Preheat the oven to Gas 5, 190 c, fan 170 c. Line a shallow 20cm (8in) square cake tin with baking parchment.

2) Place all the ingredients, except the apple and blackberries, into a large mixing bowl and beat with a wooden spoon until smooth.

3) Stir in the apple and blackberries and spread into the tin. Bake for 30-35 minutes until golden and the centre is firm to touch.

4) leave in tin for 10 minutes before turning out and allowed to cool completely. Cut into squares. Keeps for 3 days.

Monday, 19 March 2012

Wedding Idea: Bunting

I currently have a massive bag of flowery bedding you're likely to see in your Grandma's bedroom sitting in the living room. I asked family for fabric with pink/cream/burgundy flowers and patterns and have been inundated with donations!

The reason for this is, instead of having fresh flowers decorating the church, we're going for bunting. I didn't have it in mind straight away, it just came to me as I thought about how to decorate the church and the idea of having lengths of brightly coloured bunting hanging in the church really appealed to me. It's also good for a wedding on a budget and recycling materials.
We're also using bunting in the church hall and at the evening reception venue.

I got the pattern from this website: http://rosalindgracedesigns.blogspot.co.uk/2009/04/free-bunting-template-and-tutorial.html

All you need is old cotton bedsheets/shirts, bias binding, pins, thread, sewing machine, cardboard template of the size of bunting you want and a good pair of dress making scissors.

Bias binding is the long strip of fabric holding it all together. I got a 50 metre roll for about £7 from Amazon. I've been making bunting 5 metres in length.

Bunting is a quick and cheap way to decorate any venue for any occasion. I think it's perfect for a summer party and gives a vintage nostalgic feel.


Tuesday, 6 March 2012

Gift Idea #1 Mini Canvas

Friends' birthdays often have the habit of sneaking up on you and when you finally realise, you either have no time or money to get them a present. At the moment, money is often tight for me, so I came up with an idea to make a unique present that my friends' would love that was quick to make and affordable.


I have a box at home full of little bits and bobs I've found lying around, including broken brooches, bows and ribbons off packaging and chocolate boxes, buttons, little bells off the Lindt Chocolate Bunnies :) and lots of other things.
I was given a sparkly butterfly by a friend, which use to be on a ring but fell off and had another butterfly that use to be a brooch. I really wanted to use these in a project and one day I was in The Works bookshop and they sell mini canvases on easels for 99p each. I bought two and knew that I wanted to combine the two things in some way.
At home I used acrylic paints and painted the two canvases (which was quick as they are so small!) and when the paint was dried wrote the names of the friends on them with gold or silver pens and superglued the butterflies onto them.

The great thing about this idea is you can use anything instead of butterflies, maybe something that reflects your friend or something they like, as long as it's small and not too heavy. You could use any colour paint and because it's small, it could put it anywhere on a shelf, table or desk and just sit there looking all decorative and pretty :)


Monday, 5 March 2012

How to make a skirt out of a pair of jeans


We've all been there. You put on your most favourite, comfortable jeans that you have had for ages and then discover a massive hole or rip in an unfortunate place. What do you do? Well if you can't bear to throw them away, why not turn them into a skirt?
This is what I'd done with my jeans that have had holes worn into them. (The picture above is the 1st ever skirt I made and used it as a distraction from packing!)

1) cut off the legs a couple of centimetres down from the rip or hole (so it looks like really short shorts)

2) Using an thread unpicker (you can get them from haberdashery shops and online) unpick the seams up the inside legs to the crotch so it looks like an untidy skirt.

3) on the front and the back of the skirt, lie the seams that would have formed the seat of the jeans to the side and pin down.  Cut off any material that hangs down to create a straight hem.

4) Using thread that is a similar colour to the originial thread, use back stitch to stitch the seams down. Do this on the front and back of the skirt.

 5) I tried to do a similar style seam to the original one so it blended in better, however you can do whatever you like to your own skirt.

6) And after that you have your finished skirt! If you want to, you could do a hem around the bottom of the skirt if you don't like the deconstructed look that much. Also you could embellish it with sequins, ribbons, buttons etc or even sew some fabric around the bottom of the skirt to give it a really cute country look.

Hope this inspires to recycle your jeans and that you give it a go :)

Don't know what to do with the left over legs? I have an idea for a rug but that will be another post ;P